J-Buzz Plus
(adds these features)
1. 'Pre appointment' reminders
- 1. Choose the timing of when you want to send the reminder.
- There are two different methods to choose from to set the timing.
-
Days/hrs before the appointment.
-
Example: Send the text reminder 1 day and 2 hrs before the appointment.
- This would have the configuration 0102.
-
An exact time of day for the appointment reminder +
any amount of days before it.
-
Example: Send the text reminder 1 day before the
appt at 04:00pm.
- This would have the configuration 01001600.
- To set the value go to OE Opt #102, S2, Fld 49. See
below.
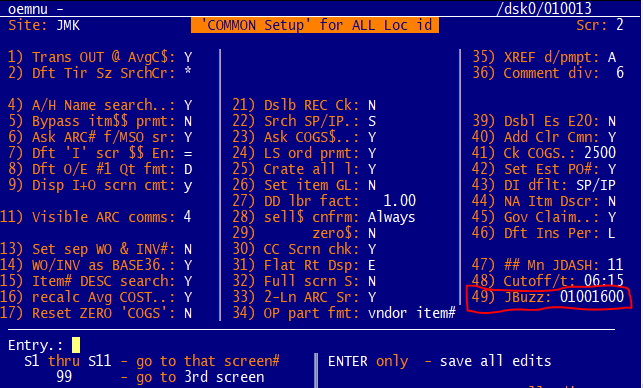
- Tip: The J-Buzz
field is coded as DDMMTTTT.
- Where DD is the days before the apt, MM, is the minutes, and TTTT is the
time of day to send the
message if it is filled in.
- 01001600 can be translated to 01 days before the apt, 00 additional hours before the apt, and at
04:00pm.
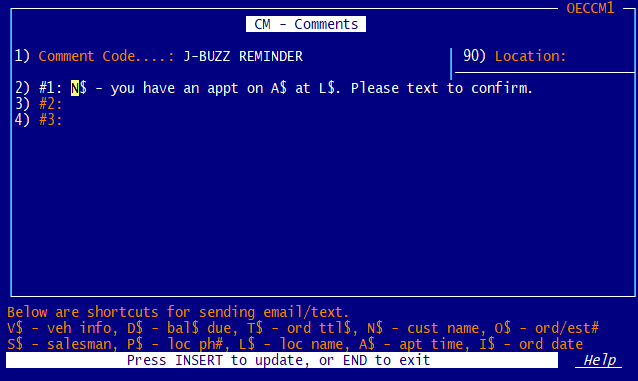
- 2. Choose the content of the message you want to send.
- This can be any message and can use data from the work order.
- Example:
- "N$ - you have an appt on A$ at L$. Please text to confirm."
- When this message is sent the values will be replaced with the right words to create the msg.
- The above message becomes:
- "John Smith - you have an appt on 10/05 at JMK Tire. Please text to
confirm."
- Set the value by creating a new 'CM' record in
O/E opt 28,
selection CM, with code value J-BUZZ
REMINDER.
- As you are filling out the value you will see all the shorthand values you can fill out.
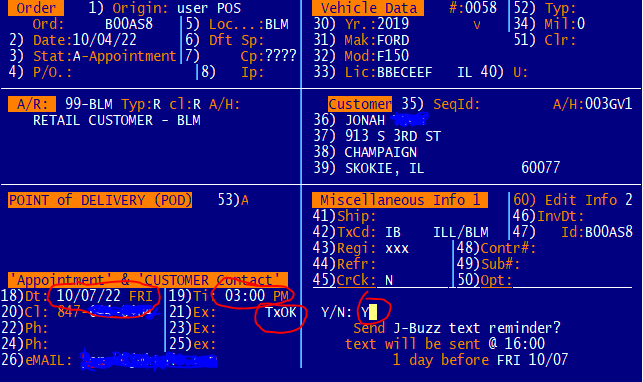
Appointment Reminder Usage
- Go to an active work order and go onto the 'O' screen.
- Make sure the order has a cell phone number on it with texting set to 'TxOK'
- The first valid phone number on the list of numbers will be chosen.
- Set an appointment in field 18 as well as a time.
- Follow the prompts, and then it will ask you whether you want to send a J-Buzz Text Reminder.
- Enter 'Y'. If successful a message will come up on the screen indicating success.
-
The customer will now get an appointment text reminder at the time you indicated.
-
If they respond to this text it will utilize J-Buzz's
platform to notify your store via email/phone call.
-
To see a history of text messages sent, go to the 'M' screen and enter 'PT' to see
msg history.
2. Post appointment followup contact
- 1. Choose the timing of when you want to send the followup.
- See above reminder timings for explanation on the format of how they are set.
- The only difference for reminders is that they are sent after the appt rather than
before
it,
and where the field is set.
- While appt reminders timings are the same for every appt, appt followup timing is dynamic.
- The timing is determined by the items on the order you are following up on.
- For example, let's say you had an order with a wiper blade on it as well as a new set of
tires.
- You may want to followup on how their new wiper blade install went a few days after the
order
went through.
- Whereas for a new set of tires you'd want to give them a longer time before asking for
feedback,
so they have time to test them out.
- J-Buzz
takes the longest days away setting from the list of items on the order and
uses that for the followup.
- So for wiper blades configured for 3 days after
and
tires configured for 7 days after, the text
would send 7 days after.
- The timing is set for each product type. If there isn't an item with a configured
product
type on the order then no followup text will be sent.
- To set the values go to OE Opt #28, select DP, and select the code value for the product types
you
want
to configure.
- The place to change for each product type is on scr 1 and is field 31.
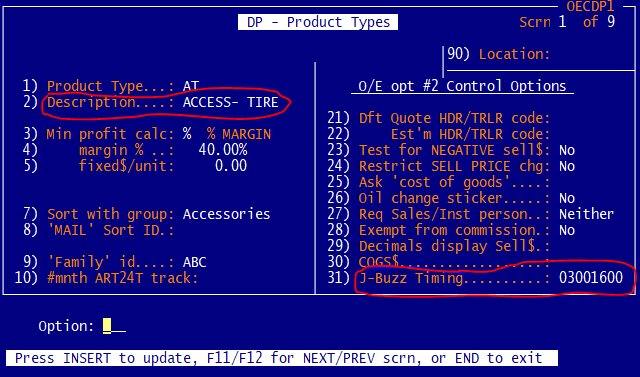
- TIP: The description for the prod type, fld 2, is what is going to be used as the service if the
service is referenced in the text msg.
- 2. Choose the content of the message you want to send.
- This can be any message and can use data from the work order.
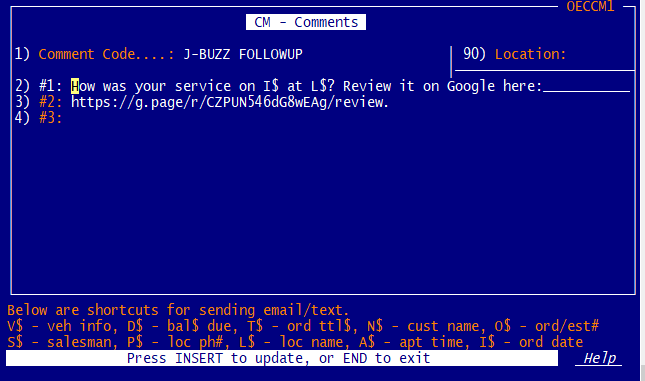
- Example: "How was your service on I$ at L$? Review it on Google here:
https://g.page/r/CZPUN546dG8wEAg/review."
- This message will be filled in with the correct date and location when it is sent.
- It is recommended to use a social media platform to have your service reviewed such as Google,
Facebook, or Yelp.
- To get the customized links for your store, contact Tire//SMART
for assistance.
- Set the value by creating a new CM record in O/E opt 28, selection CM, with code value J-BUZZ
FOLLOWUP
Appointment Followup Usage
- Go to an active work order and go onto the 'O' screen.
- Make sure the order has a cell phone number on it with texting set to 'TxOK'
- The first valid phone number on the list of numbers will be chosen.
- On the list of items on the 'I' screen, make sure one has a product type that is configured for J-Buzz
- When the order is ready to be consummated, perform an 'E20'.
- The followup text message will then be scheduled to be sent.
- For info on the audit trail and how it used J-Buzz,
see reminder usage above.
3. Confirm appointments with J-Confirm
4. 'Available stock' reminders with J-Stock
5. 'Marketing' Reminders
- Use Market Maker
to generate a marketing message to send to customers.
- Uses extrapolated mileage using vehicle's service history for routine operations such as:
-
Oil changes.
-
Alignment checks.
-
Brake checks.
-
Seasonal.
- Winterization - Snow tire change.
- Springtime - A/C service, remove snow tires, etc.
- Can be automated or ran manually from A/H option 6.
7.J-Followup
- Allows sales person entry of vehicle specific service comments to track a followup action
which is then:
- Sent electronically by your mail marketing provider, to send your
customers a reminder of the work to be done.
- Provided as a reminder at Point Of Sale to salesperson next time
customer comes in, to ask customer about service needs for that vehicle.
- Reported to your sales staff for direct follow up.
- Click here to learn more.